Enjoy this homemade khameer, a delicious old-fashioned Emirati bread. Tender, rich rounded bread with golden top that you'll sure to enjoy.
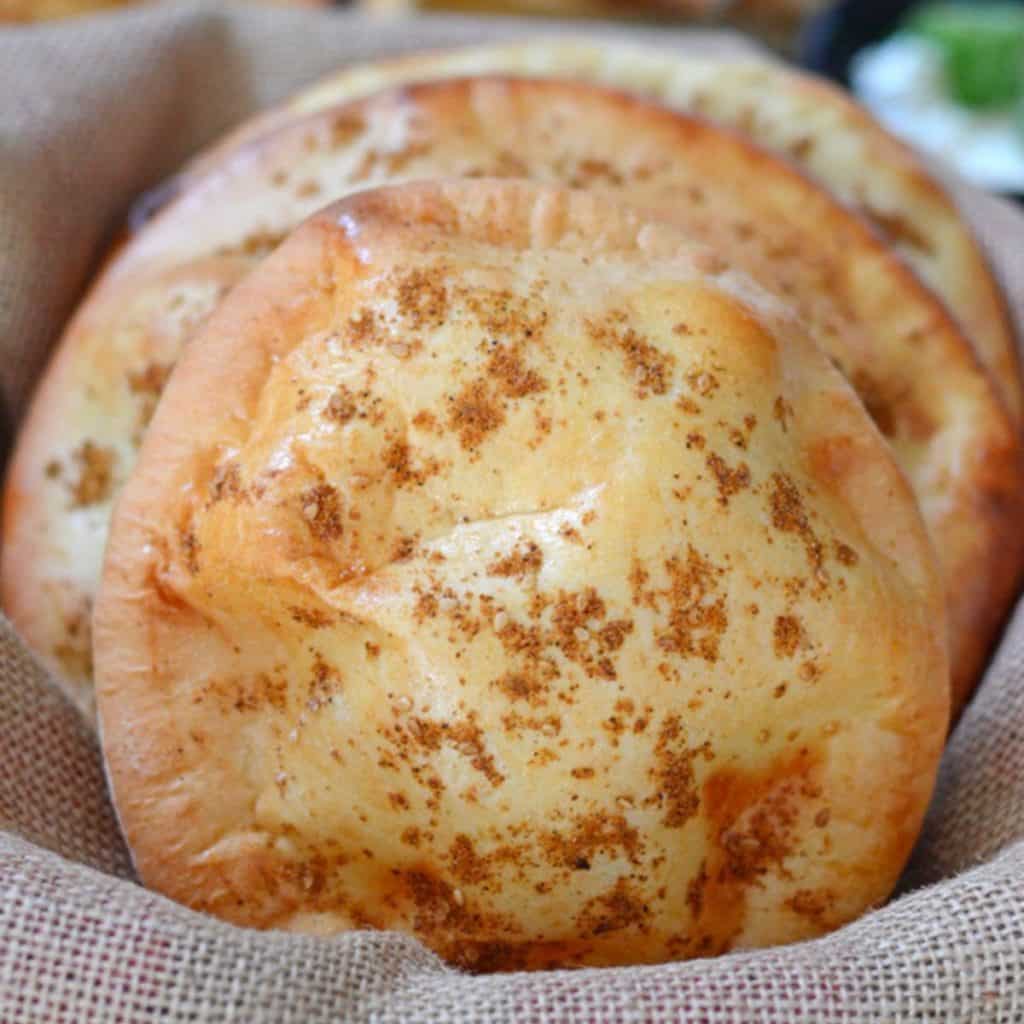
Khameer bread
Emirati people enjoy this bread as it always brings back good old memories. I've seen many recipes online, many uses dates to sweeten the bread and others uses saffron or turmeric to add flavor and yellow color. I've asked an Emirati friend about this bread, she gave me a simple form of this bread for busy moms that does not require the hassle of soaking the dates and dissolving saffron threads. Tastes super delicious for any stuffing you like.
Back in the old days they used to bake these in coal ovens which no more exist. These days for modern home they have special small oven you can bake it in. Unfortunately this kind of ovens are not available in the US, so I baked mine in my home oven and it turned out great, chewy, thick, tender and flavorful.
Let me lure you a bit to try this recipe. You've got falafel recipe or maybe you just slow cooked a traditional foul medames for a classic Middle Eastern breakfast/lunch but you are craving a nice puffy flat bread to go with it.
You dream of making pockets - but not the usual pita pockets - or simply tear up chunks of hot white flat bread with steam escaping dipping it directly into your bowl of beans... can you feel the bliss of the moment?
How to make Khameer?
Welcome to the heaven of homemade bread. Here is how to prepare it
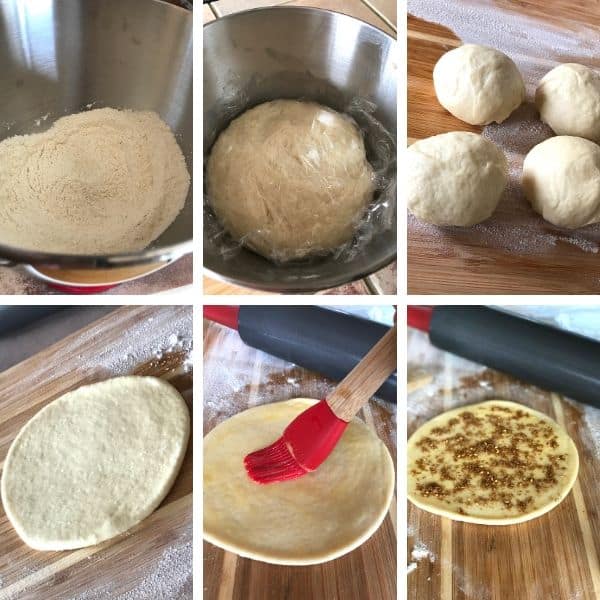
- In your mixing bowl, combine flour, yeast, dry milk, salt, sugar and baking powder.
- Add oil and water then mix until you get a consistent and sticky dough. Cover and let it rise.
- Divide the dough into 4 balls, let it set for 10 minutes covered.
- Roll into a thick circle and brush with eggs.
- Sprinkle top with Za'atar or sesame seeds and bake in a VERY HOT oven.
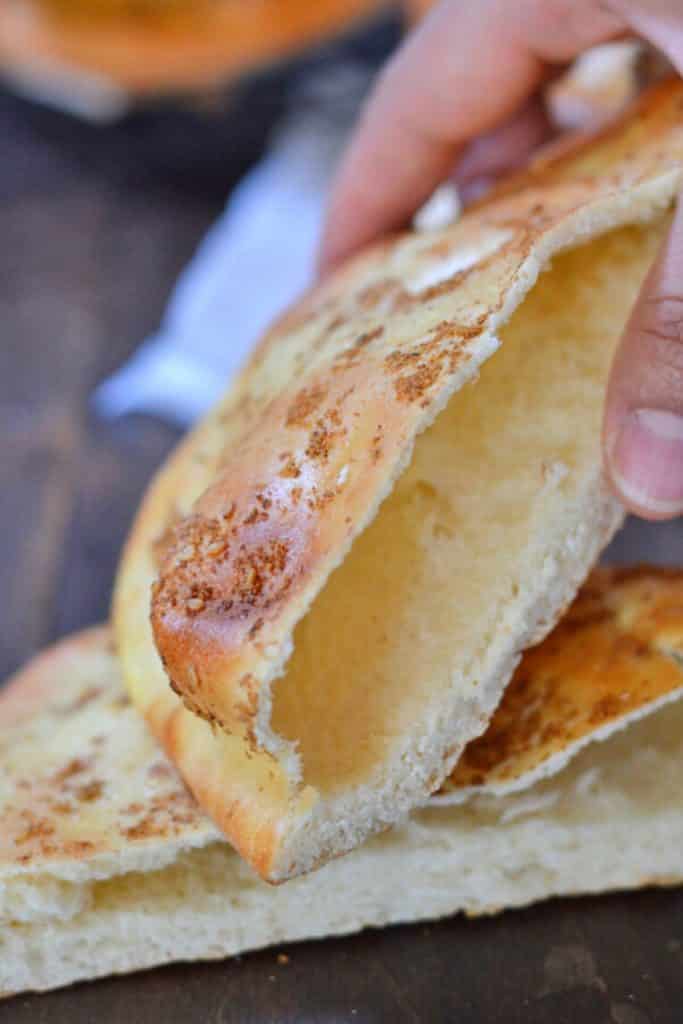
You can stuff your khameer with cream, honey, date or date paste and nuts for a sweet stuffing. Or you can go the savory way and stuff it with falafel, cheese, labneh, basil, black olives ... etc. If you are going to stuff it with sweet variations then do not top with za'atar.
Related Recipes
- Unleavened bread is easy to make and does not require any special ingredients or equipment. All you need is flour, water, olive oil and salt.
I hope you'll like this recipe and please if you make this recipe, snap a pic and hashtag it #amiraspantry — I love to see your creations on Instagram, Facebook, Twitter!
Don’t want to miss a recipe? Sign up for the FREE Amira's Pantry newsletter delivered to your inbox with lots of tips and surprises! And stay in touch with me on Facebook, Twitter, Pinterest, and Instagram for all the latest updates.
You may need:
The following are affiliate links. We are a participant in the Amazon Services LLC Associates Program, an affiliate advertising program designed to provide a means for us to earn fees by linking to Amazon.com and affiliated sites.
If you need an oven safe cooling racks. Heavy gauge wires, all stainless and not flimsy.

![]()
If you like this recipe do not forget to give it a ⭐⭐⭐⭐⭐ star rating and attach a photo of your finished dish. It is always a pleasure of mine to see your photos and check your own take of the recipe. Thank you.
Related Recipes
- Whole wheat pita bread is a nutty soft pita bread made from whole wheat flour mixture. Great for making falafel sandwich, dipping in Hummus or using using to mop up stews and soups.

Khameer bread
Ingredients
- 2 cups bread flour.
- 2 Tablespoons dry milk.
- 2 Tablespoon sugar.
- ½ Tablespoon dry yeast.
- ½ Tablespoon baking powder.
- 1 teaspoon salt.
- 2 Tablespoons oil.
- ½ - ¾ cup warm water.
For the top: ( optional)
- 1 egg.
- 2 Tablespoon Za’atar or sesame seeds.
Instructions
- Preheat your oven to 550F. Note1
- In your mixer bowl, combine the first 6 ingredients and mix well with a fork.
- Add the oil and start mixing, gradually add water until you reach a consistent soft dough, keep kneading for at least 10 minutes.
- lightly oil the bowl and the dough, cover with plastic wrap and let it rest until doubled in size, will take around an hour depending on your kitchen temperature.
- Take the dough out, cut into 4 equal parts, shape each part into a ball, cover and let it rest for 10 minutes.
- Roll each ball into a circle no more than ¼ inch thickness, cover and let it set until you finish the rest of the balls.
- On your cooling rack, carefully flip the pitas on the other side so the face that was on the counter is now facing up. Note2
- Brush with egg and sprinkle some sesame seeds or Za’atar in top.
- Open the oven door carefully trying to put your face away from the heat of the oven, bring the middle rack of your oven out a little and place the cooling rack with the pita on it. Push the oven rack in and close the oven door.
- Bake for about 2-3 minutes until it puffs nicely and the top is little browned. Note3
- Take it out of the oven and with a spatula take the pita off the cooling rack and let it cool completely.
- Give your oven 2-3 minutes to get back to the high temperature before placing the next pita in.
- When the pitas are completely cooled, store n a zip lock bag.


ForeverMama
Fantastic bread!! The texture and end result is one of the best, making this a BEST OF recipe to be made for many years to come. I love your recipes, Amira and thank you so much for sharing.
Virginia Pacheco
Hello Amira…what flour do you use to make your Khameer and is it pure organic flour? Thank you for your response.
Amira
I use bread flour Virginia, I hope this helps.
Evelyne CulturEatz
Wow look at that bread and the gorgeous pocket inside! I love the idea of making ot more sweet or savory with an extra step.