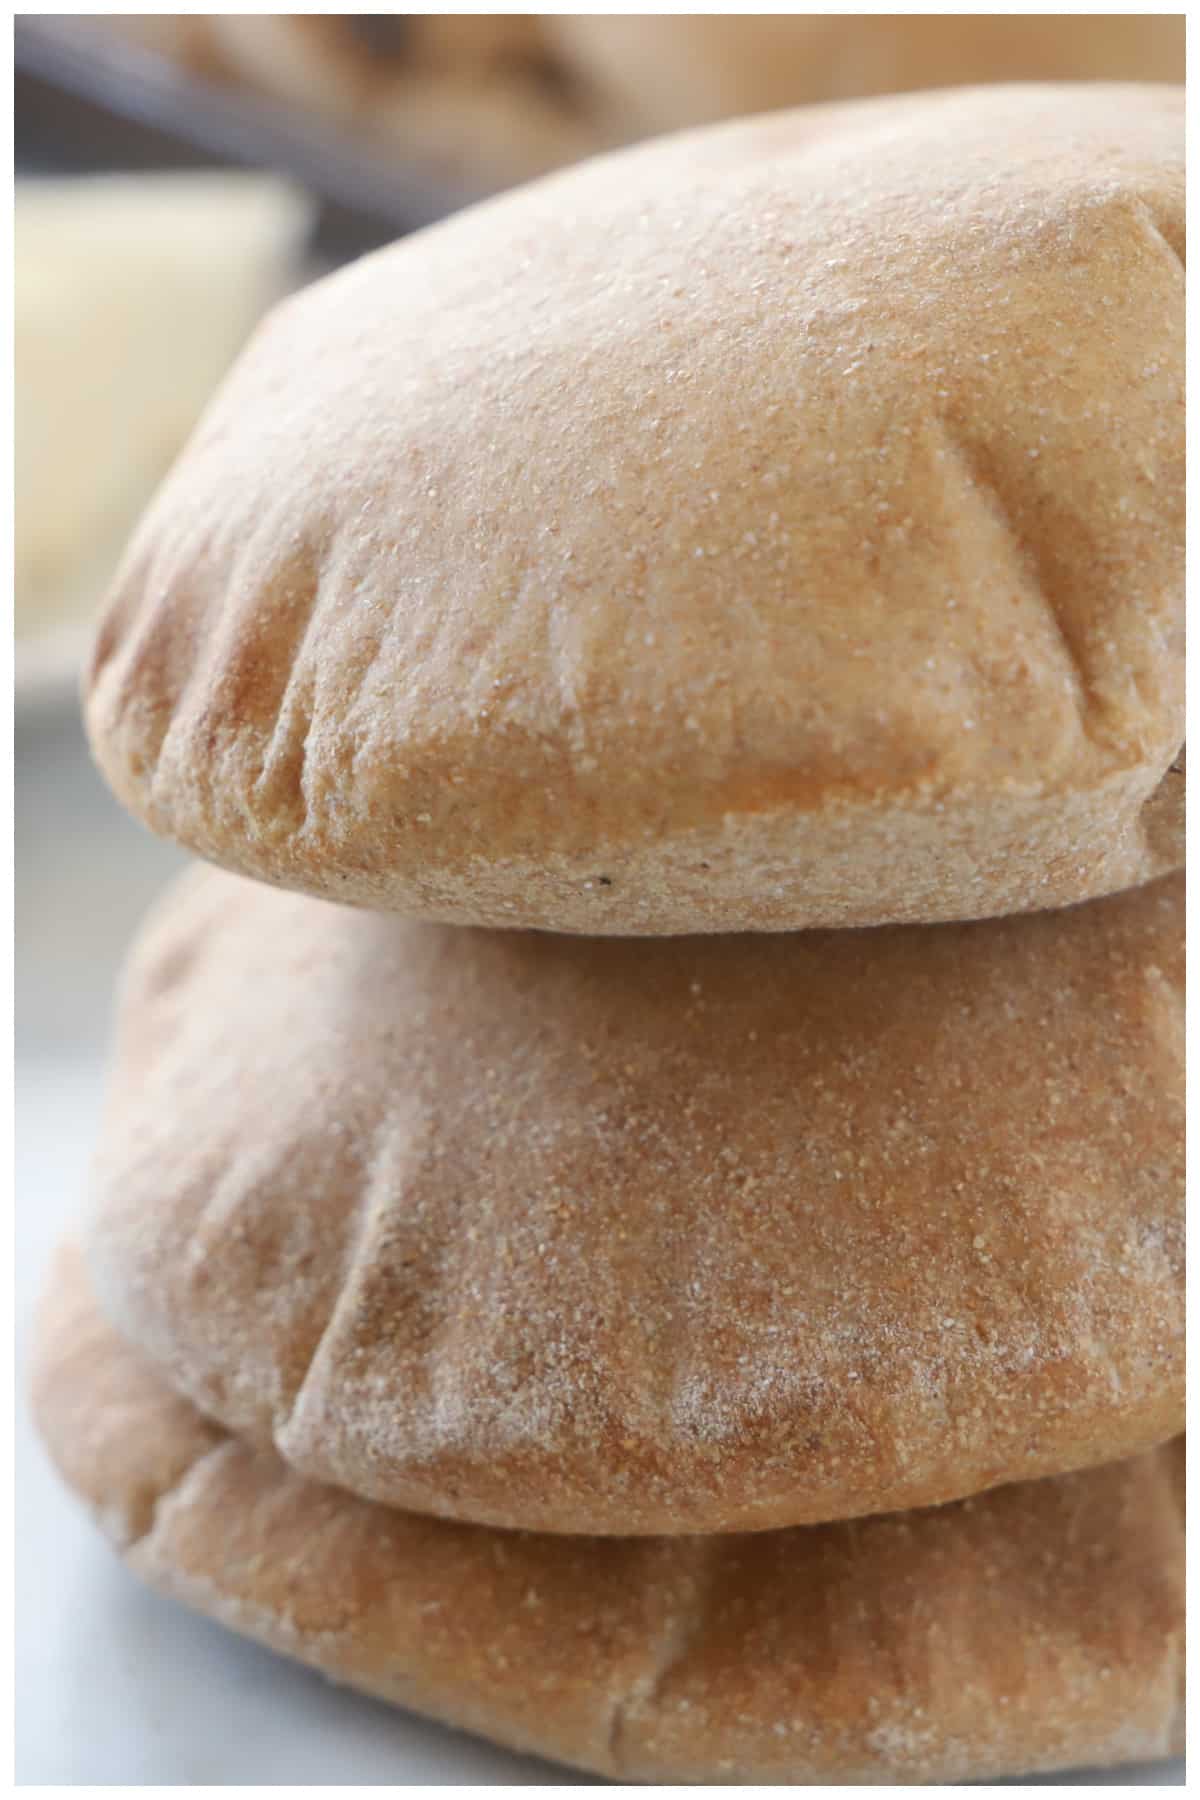
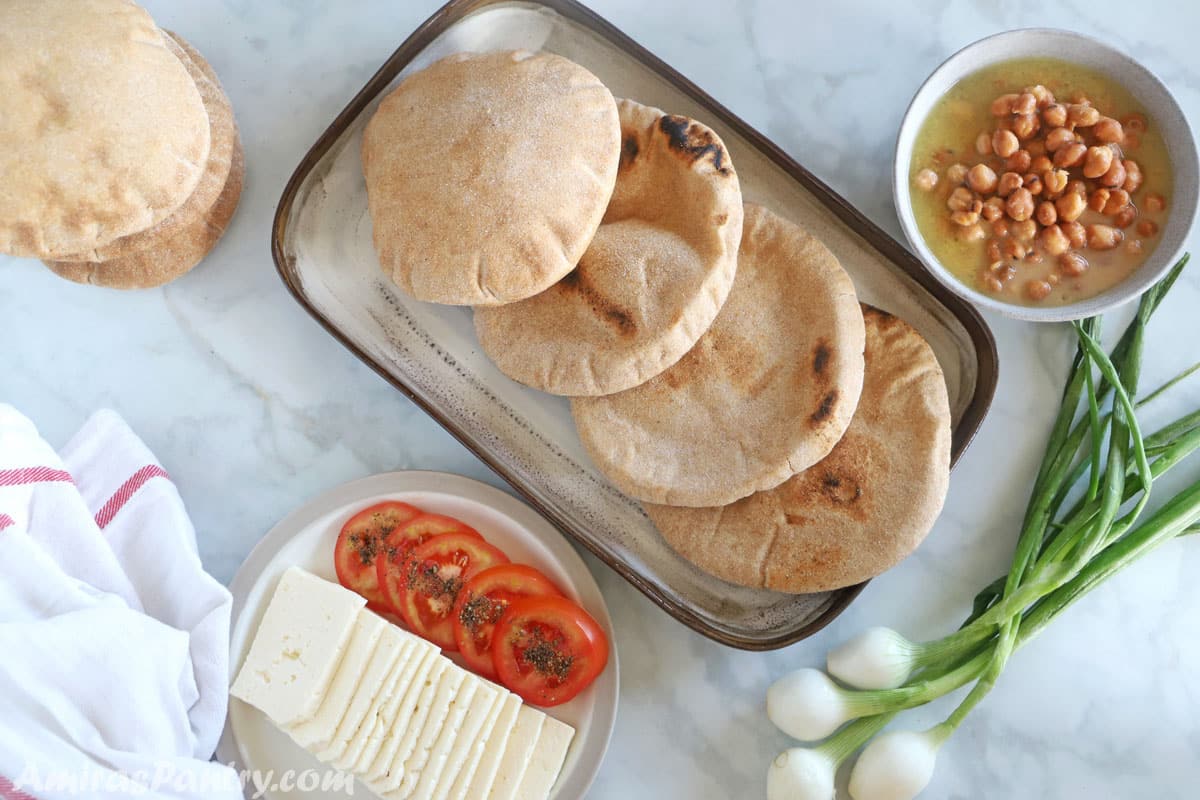
Nutty, chewy, and puffy whole wheat pita bread right out of your oven. Fresh, hot, and steamy, unlike the ones you get from the stores. Nothing is like freshly baked pita bread, if you have lived in the middle east, you know what I am talking about.
I've shown you before how to successfully make pita bread, this time we are going to take it to the next level. Making pita bread with whole wheat flour gives your pita a desirable texture and a nutty flavor.
Jump to:
- ❤️ Favorite things about this recipe
- 📝 Ingredients you'll need
- 🥣 Before you begin: essential tools
- 🥄 Step by step: instructions
- 👍 Let's make the perfect recipe: Amira's tips
- 🧺 How to store leftovers
- 🍽️ Perfect pairings: what to serve with
- ⌛ Time saving tips: make ahead and shortcuts
- Related Recipe
- Need some bread rolls?
- Whole Wheat Pita Bread
❤️ Favorite things about this recipe
- Making your homemade pitas is very rewarding. There is nothing like hot, fresh pita pockets right out of your oven.
- You will learn how easy it is to make delicious pita bread, you will never go back to the store-bought pitas.
- A great recipe for homemade bread made with few pantry ingredients.
📝 Ingredients you'll need
Note: This is an overview of the ingredients. You'll find the full measurements and instructions in the recipe card (printable) at the bottom of the page.
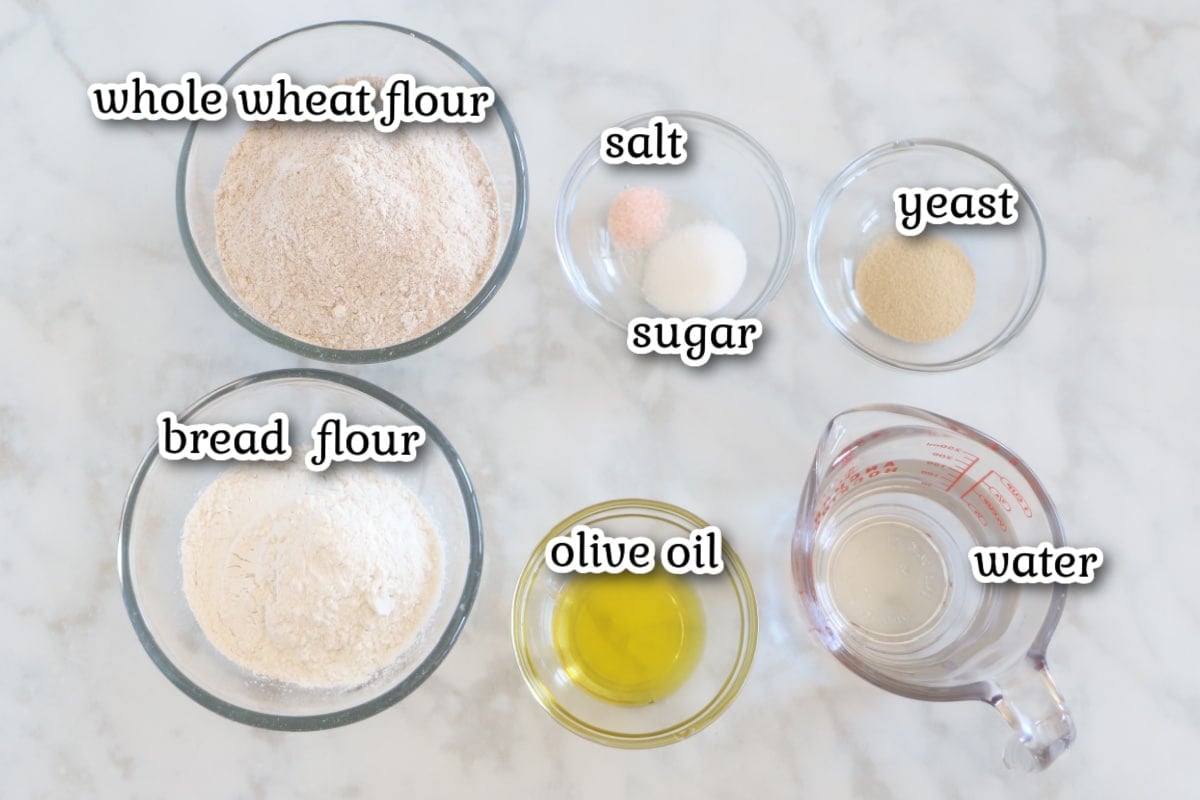
- Whole wheat flour because we are making whole wheat pitas.
- Bread flour : I am going to explain more about this later in the post. You can use all purpose but bread flour ensures pocket formation.
- Salt so it will not be bland.
- Yeast: Use instant yeast if you have active dry yeast make sure to hydrate it first.
- Sugar to activate the yeast.
- Olive oil, to add some richness to the bread.
- Warm water to form the dough.
🥣 Before you begin: essential tools
The following are affiliate links. We are a participant in the Amazon Services LLC Associates Program, an affiliate advertising program designed to provide a means for us to earn fees by linking to Amazon.com and affiliated sites.
- Pizza baking stone or a sturdy baking sheet.
Don't forget to check out my Amazon storefront for some of my favorite products!
🥄 Step by step: instructions
Note: This is an overview of the instructions. The detailed instructions are in the recipe card below.
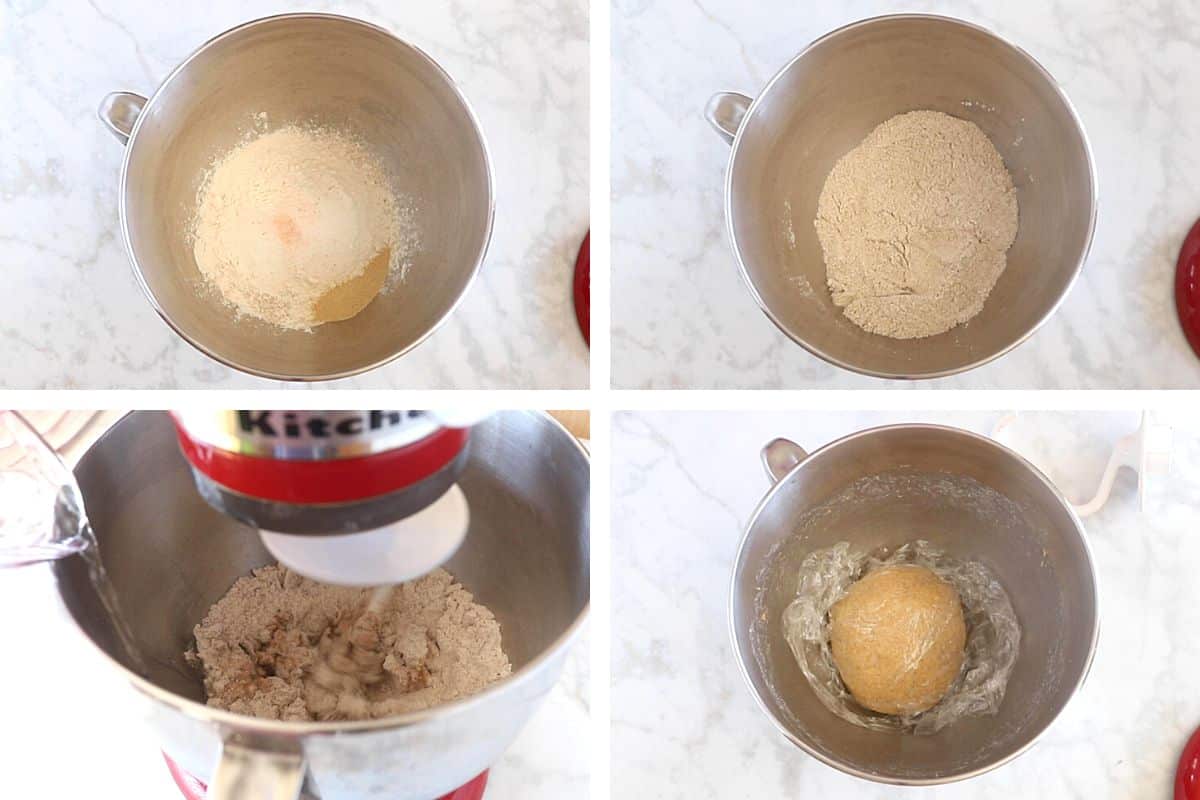
- In the bowl of a stand mixer fitted with a dough hook attachment, add the dry ingredients: flour, salt, sugar, and yeast.
- Mix well with a spoon.
- Pour in olive oil and start your mixer with a dough hook attached. Gradually add water and continue kneading for 8 minutes with your mixer.
- Take the dough out, add a little bit of oil (1 teaspoon) to your mixer bowl. Place the dough ball back in the bowl and turn it around to cover with oil from all sides. Cover with plastic wrap or a clean tea towel and let it rise in a warm place for 1 hour or until doubled in size.
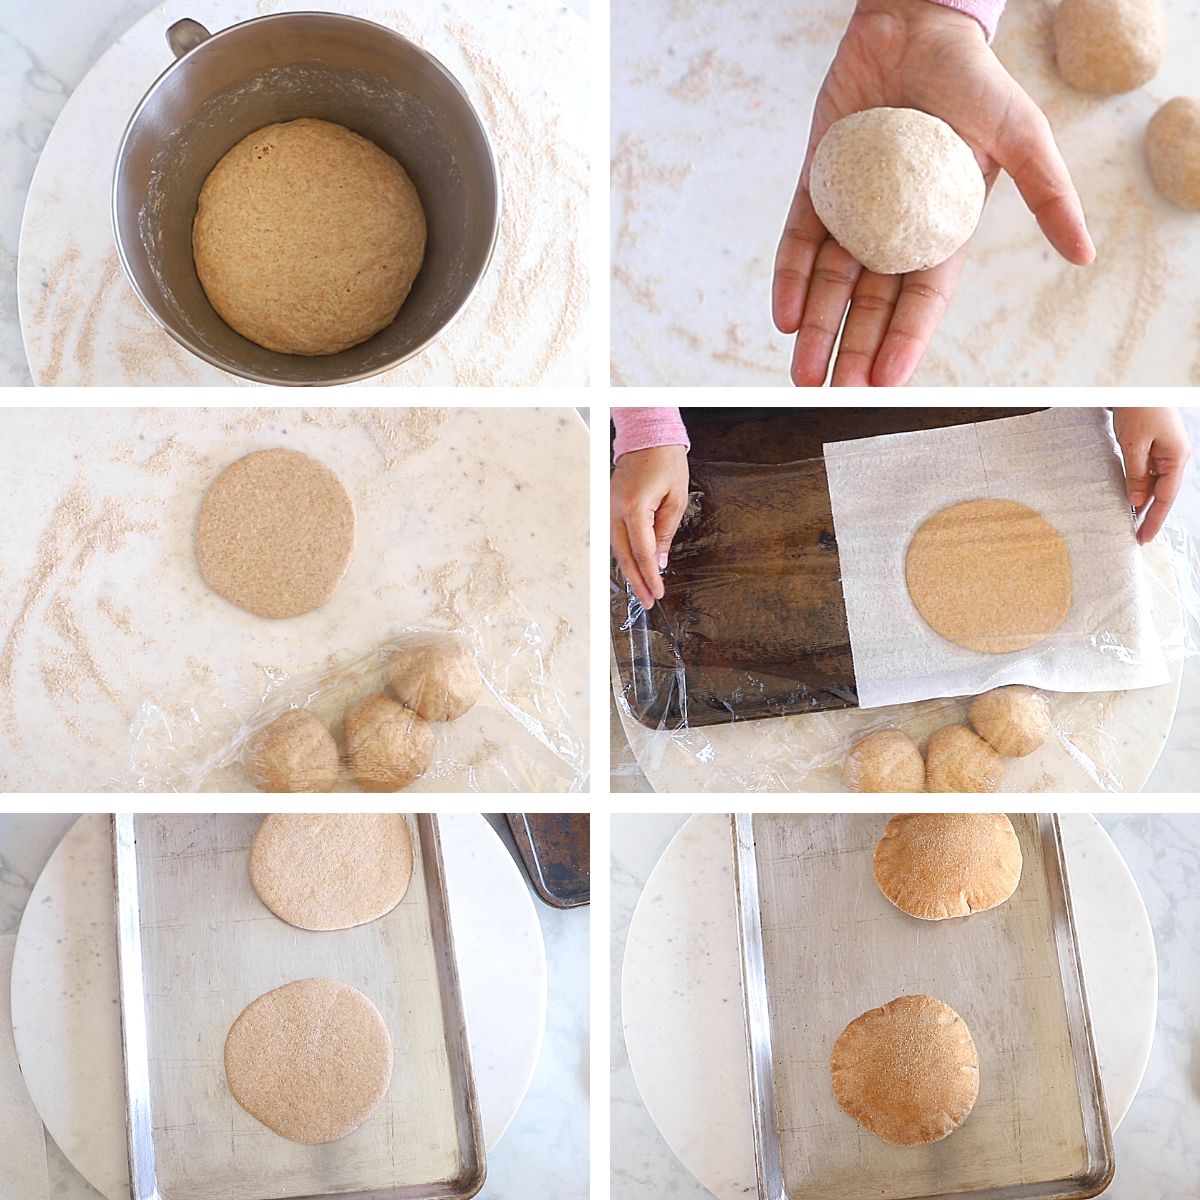
- Place a baking stone or a sturdy baking sheet in the middle of your oven and preheat oven to 550F or as high as it can go. Punch the dough lightly, then take it out and cut it into four equal pieces, each roughly weighing 105g.
- Lightly dust your work surface with a little flour and form each part into a ball. Cover dough balls with plastic wrap.
- Take the first ball and roll using a rolling pin into a disc that is ¼” thickness.
- Place the rolled pita on a piece of paper kitchen towel, set aside covered with plastic wrap, and let it rest for 30 minutes.
- After 30 minutes, carefully take the hot baking sheet/pizza stone from the oven and carefully flip the pita on using the kitchen towel.
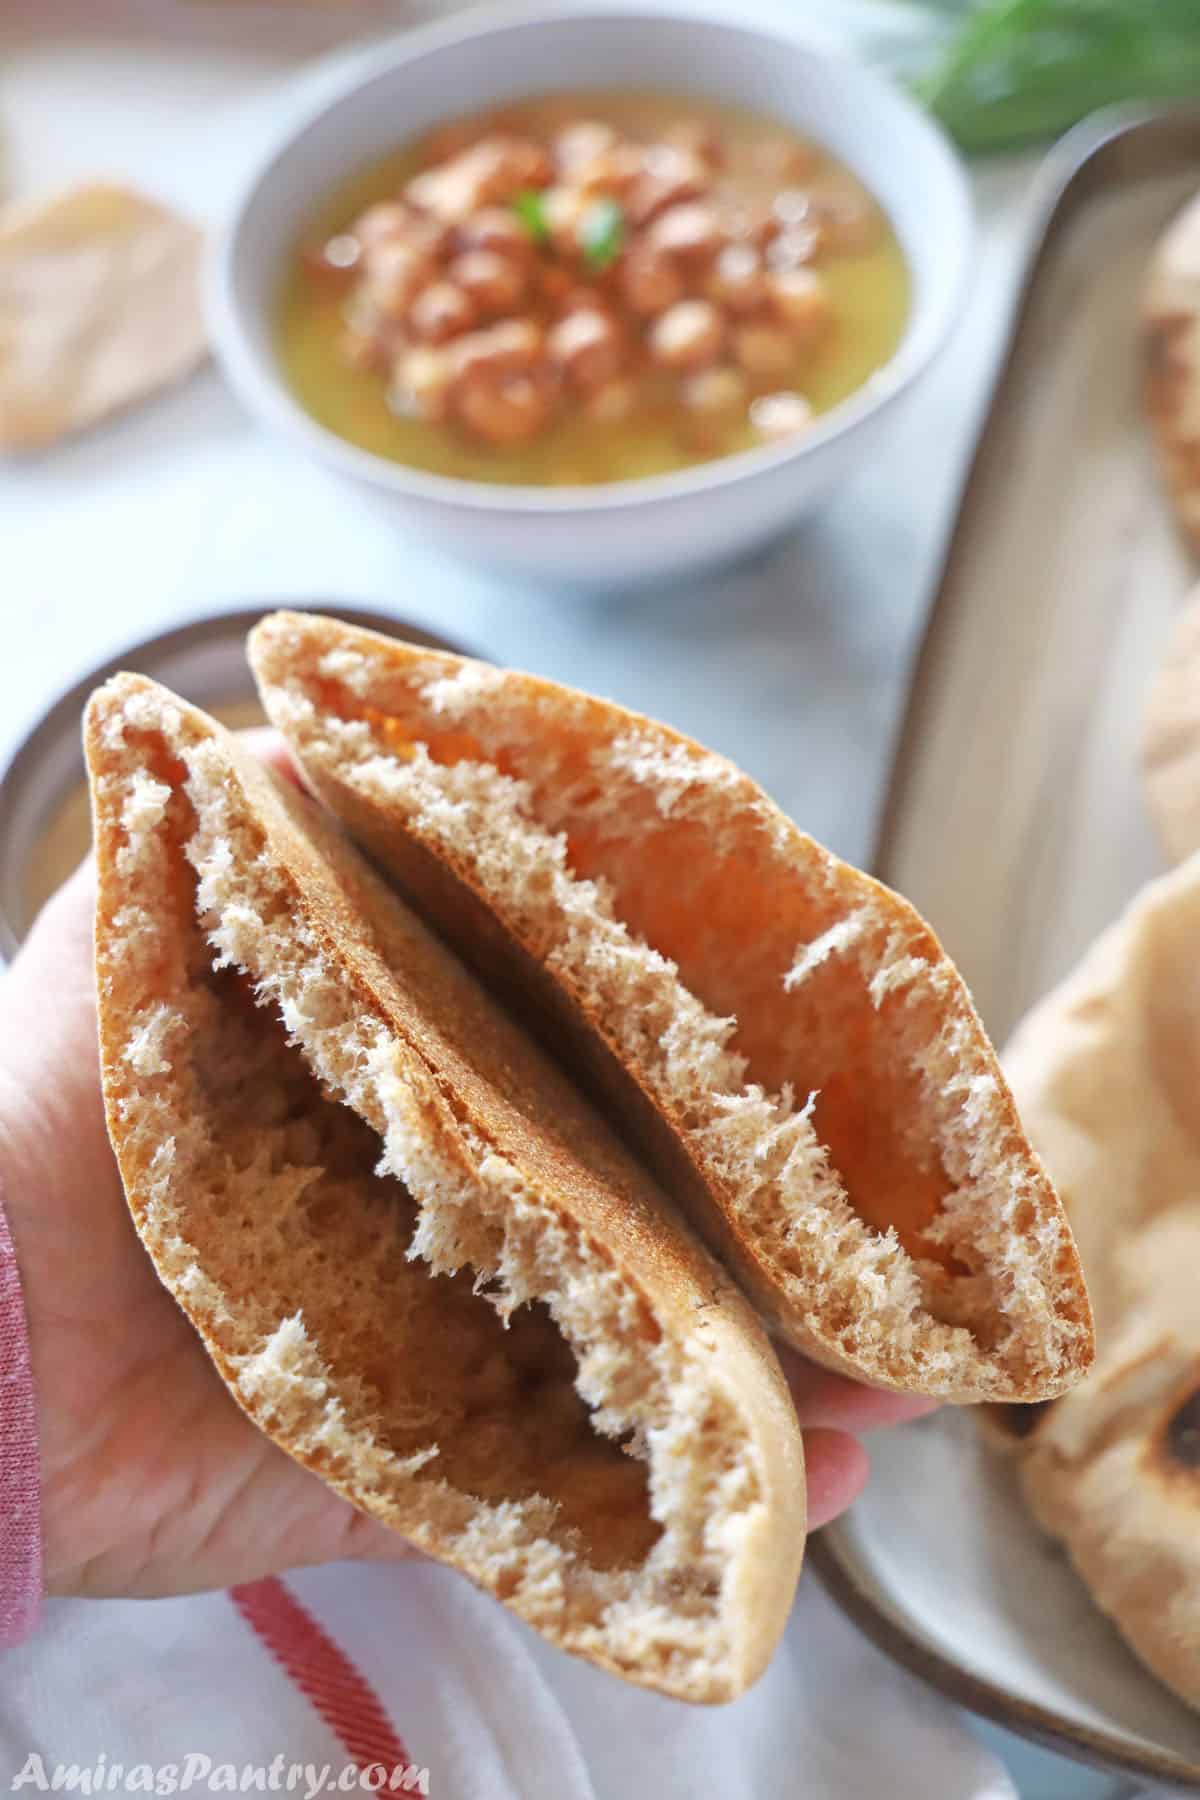
- Bake for 3-4 minutes, your pitas are done when they have puffed nicely.
👍 Let's make the perfect recipe: Amira's tips
Here are some tips and tricks to help you understand and be able to get those perfectly puffed up pitas every time.
- Why use bread flour? Whole wheat flour only will not get you the pockets you crave in a pita as it does not generate gluten as well as plain and bread flour. Adding a little more bread flour to the dough ensures that we have enough gluten to help the dough stretch in the oven and develop the air pocket we are looking for.
- Kneading the dough long, this is done so we are sure that the dough has generated enough gluten to help the pita stretch in the oven without being ruptured.
- Oven temperature: one of the early tricks that I've been taught is to bake pita bread in an extremely hot oven. Heat in the oven dries the top of the pita quickly so when steam starts to build up in the center, the surface is sturdy enough to keep that steam in without being ruptured.
- The kitchen towel thing, back in the old days I used to have some cut up paper kitchen towels to use over and over in baking my pita bread. When you leave the pita for the final proof and place it as is on the hot baking sheet, it will bake with one side thick while the other is paper-thin. This is not the case when you flip the pita before baking. While we will still get one side thinner than the other, the difference is not that huge.
🧺 How to store leftovers
Refrigerate - Store leftover pita bread in an airtight bag on your counter for up to 3-4 days. Refrigerate for longer.
Freeze - Whole wheat pita bread can be frozen once cooled down completely. Place in a freezer bag and freeze for up to 2-3 months.
Reheat- To reheat, wrap in a clean kitchen towel and microwave until thawed.
🍽️ Perfect pairings: what to serve with
- Pita seriously has endless uses. Dip in hummus, tahini, or baba ganoush.
- Makes great falafel and eggplant sandwiches.
- Use it to scoop some ful medammes.
- You can also use it for fatteh, chicken shawarma bowls or fattoush.
⌛ Time saving tips: make ahead and shortcuts
Many readers have tried making the dough ahead, letting it rise on the counter, then refrigerating it covered overnight. Take it out a couple of hours before baking let it come to room temperature then proceed with the recipe.
Related Recipe
- Unleavened bread is easy to make and does not require any special ingredients or equipment. All you need is flour, water, olive oil and salt.
- Taboon bread is one of the most famous Palestinian traditional bread recipes usually baked in a special oven. With a special trick let me show you how to make this delicious bread in your ordinary home oven.
- Poori is an Indian fried bread made with simple everyday ingredients and often enjoyed with potato curry or chana masala.
- This hot dog bun recipe makes soft and fluffy buns perfect for holding your favorite hot dog or burgers. With simple ingredients enjoy freshly baked buns right from your own kitchen.
Need some bread rolls?
- Bake up crusty and fluffy Kaiser Rolls with this easy recipe. Perfect homemade bread for any meal of the day.
- Incredibly delicious and satisfying sweet bread rolls for your morning coffee or afternoon snack. This is a recipe from my grandma's kitchen, no wonder it is a family favorite.
Have you ever tried making pita bread? If so, I would love for you to leave me a comment and share with us your favorite tip!
If you love this recipe, please leave a ⭐⭐⭐⭐⭐ rating! Thank you.
Whole Wheat Pita Bread
Ingredients
- 1 ¼ cup (178g) whole wheat flour.
- ½ cup (64g) bread flour. Note1
- 1 teaspoon sugar.
- ¼ teaspoon salt.
- 1 teaspoon instant yeast
- 1 Tablespoon olive oil
- ¾ cup warm water.
Instructions
Making the dough:
- In your mixer bowl, add the first 5 ingredients.
- Mix well with a spoon.
- Pour in olive oil and start your mixer with a dough hook attached.
- Gradually add water and continue kneading. Note2
- You should continue kneading for 8 minutes using a mixer and about 12-15 minutes if kneading by hand. Note3
- Take the dough out, add a little bit of oil (1teaspoon) to your mixer bowl. Place the dough ball back in the bowl and turn it around to cover with oil from all sides. Cover with plastic wrap and let it rise for 1 hour or until doubled in size.
Shaping and baking:
- Place a pizza stone or a sturdy baking sheet in the middle of your oven and preheat oven to 550F or as high as it can go.
- Punch the dough lightly then take it out and cut into 4 equal parts, each part roughly weighs 105g.
- Lightly flour your working surface with whole wheat flour and form each part into a ball. Cover with plastic wrap.
- Take the first ball and roll into a disc that is ¼” thickness.
- Place the rolled pita on a piece of paper kitchen towel, set aside covered with plastic wrap, and let it rest for 30 minutes.
- Continue with the rest of the balls until you’ve formed 4 pitas, each placed on a piece of paper kitchen towel and covered with plastic wrap. Note4
- After 30 minutes, carefully take the hot baking sheet/pizza stone from the oven and carefully flip the pita on using the kitchen towel.
- Bake for 3-4 minutes, your pitas are done when they have puffed nicely.
- If you want, you can brown the top by turning the broiler on, or leave them in the oven for another 2 minutes. Notice that this will make the pita harder.
- Take theta out and cover with a clean kitchen towel until serving time.
Video
Notes
- Note1: You can use all-purpose flour but it might not give you the pockets that you want in some loaves. It will still taste delicious though.
- Note2: Gradually add water until you get a dough that is a little sticky. Dough might stick to the bottom of the mixing bowl. You will probably need anywhere from ¾ cup of water minus two tablespoons to ¾ cup of water. However, if it seems too wet add more flour by the tablespoons but not more than 2 tablespoons.
- Note3: We need gluten to develop, so make sure to knead the dough long enough to develop the gluten we want.
- Note4: Using a paper kitchen towel is a trick I have learned long ago. This is done so you’ll not end with one side of pita that it too thick while the other is paper-thin. Although pita always has one side thinner than the other but this trick makes the thin side not too thin. Also, it helps you not rupture the surface while transferring the loaves to the baking sheet to help develop the pocket.
- Serving suggestion:
- Dip in hummus, tahini, or baba ganoush. Pita bread makes a great falafel sandwich. You can also use it for fatteh, chicken shawarma bowls or fattoush.


Ellen
Delicious recipe! Love the technique using the paper towel to flip them into the pan. Best pitas I have made.
Jessica
Hi Amira,
I have made these several times. I followed the recipe to a “T”. They come out perfectly!! My family loves the too!
Thank you for sharing this recipe.
~Jessica
Kourt Korrina
I made this recipe, and it turned out perfect!
Shruti
Wow oh wow these were so good! can’t believe how easy these were to make.. will definitely be making again!
Eman
Salaam dear sister,
This it it! The perfect recipe, msA! I have tried about 4 recipes for pita and I have found the perfect one. You are spot on with the weights. I never have to add any extra flour, just mix it in the bowl with a wooden spoon and knead it for longer if you are using all purpose to help make more gluten. I actually just use a towel and do not flip it, basically just keep the more wet side down and they puff up fine. I also use a tortilla press with a piece of cereal box wax paper in the press and it comes out perfect. I do let them rest to rise after I press them on a towel, that I also cover with a towel to keep them from drying out. Barik Allah feeki 🙂
Amira
Eman, you are so sweet. Jazakom Allah Khairan for these beautiful words and for sharing your process in details. I do not have a tortilla press but you got me tempted. SO glad you liked the recipe.
EllenMarie
This pita is yummy. I tried an overnight method per an earlier comment. I made the dough, rested one hour on the counter, then stashed it in the fridge overnight. Next day, it sat out two hours, I then proceeded with the recipe. The paper towel step was interesting. I thought the dough would stick to it, but it did not. I made five 3 oz pitas, and used my beloved pizza stone. Perfect for the za’atar I made yesterday. Thank you, Amira
Nora
Is this the Egyptian baladi bread , or more pits like ?
I would really appreciate a recipe for baladi bread.
Thank you Amira
Amira
Nora, I can't tell you how many times I have attempted to make the baladi bread but no luck yet. This one is not it but the closest I could get is this Taboon bread recipe, it is not balad but a little closer. Hope this helps.
Shannan
My dough raised beautifully but I only had 1 pita fluff up. Is there a trick to getting them to fluff up? I have to say most of mine came out more square then round. Do you think that had anything to do with it?
Heidi
Can honey be used in place of the sugar?
Amira
I haven't tried that Heidi but it seems possible!. Please let me know if you tried it. Thanks
Gladys
Hi can I shape the dough and put in fridge overnight, next day only roll and bake?
Amira
Gladys, I haven't tried that yet. Please let us know if you did.
Heather
I've tried a lot of pita bread recipes and prefer a whole grain for both superior nutrition and flavor. This is the best recipe yet! I appreciate that the measurements are also available by weight; this really helps provide consistent results.
Amira
Thank you so much Heather for your feedback, I am glad you liked it. And yes of course measurements in weight really helps especially in baked good, I am trying my best to redo all my recipes that way.
Ellen Baker
You doubled/tripped the cup recipe amounts but didn’t double/triple the weight amounts.
Amira
Ellen, you are right unfortunately this is done automatically. I will remove it so it does not cause any confusion.
Spencer Doidge
This is a really good pita bread! But I want to go a step further and use only whole wheat flour.
I am inexperienced with baking, and I'm obsessed with making bread with no white flour. It has been so-so, not great. So I tried mixing the whole wheat flour with water and letting it sit overnight. That changed the flour into stretchy soft and sticky more like white flour would be. It made the bread a lot better. Do you think that idea could be used to make a recipe for pure whole wheat pitas with white no flour at all?
Amira
Hello Spencer, thank you for sharing your idea. I haven't tried this before to be honest and have never tried it in baking before but it is really very interesting. Please do let us know if you make it.
NM
I made it with whole wheat flour only. The recipe was great!! For company, I would use bread flour. The tips are super... i make a lot of pita bread but this is the best recipe!
Amira
Thank you so much NM, so glad you liked it.
Amira
Thank you so much for your feedback, so happy you liked it.
Dalia Blass
I tried this and the dough is very sticky making it hard to roll out. I added flour but that did not help and ruined the taste a bit... any tips?
Amira
Dalia, the main culprit is usually the amount of water, you need to add it gradually until the dough comes together. But it also may come to the way of kneading the dough. This video explains a lot about this, I hope this will help.
Enyzee
Can this be made in a pan on the stove
Amira
Yes you can follow the directions I mentioned in my original pita bread and it should puff as well. Let me know how it went with you.
Enyzee
It turned out great. Most of them puffed up. Thanks
Amira
This is awesome, keep trying and you'll get the hang of it. Thank you so much for your feedback.
Catherine
Thank you for this recipe. As someone new to this type of bread making, I would love to see a video of you making the bread. Any chance that you’ll make a video? 🙂
Amira
I believe I have one already. Will check why it is not shown in the post but until we fix that here is the youtube video.
Christine
oh my goodness, i LOVE your recipes!!! I have a dear Egyptian friend that I wanted to cook for and I was blessed to have stumbled on your page. I just made the pita last night, DELICIOUS!!! I will never buy it from the store again. I also made your falafel recipe, it is perfection!! aaand the bechemel pasta was also fabulous! Thank You for sharing such authentic, lovely recipes that are easy to follow and turn out beautifully. I am excited to try more, but the pita and falafel will definitely be regulars in my kitchen. 🙂
Amira
Christine, thank you so much for your sweet and encouraging words, I am so happy that you've liked the recipes. If you or your friend need a specific one please do not hesitate to contact me. Shoot me an email or leave a comment anywhere in the blog, I love to help.
Christine rogers
So good and so easy ! Are the calories on this per pita ? Assuming yes but doenst clarify
Thank you!
Rasha
I have tried many recipes for the pita bread. This is by far the best one and so easy to do. Thank you so much. I was trying to find Khatyef recipe in your site for Ramadan. I will keep searching. If it's not there, please do it for us.
Amira
Rasha, I am soooooo pleased that you've liked the recipe.. you've made my day girl 🙂
For the Katayef here is the recipe
I hope you'll like it.