Sweet, buttery and flaky baklava is a crowd pleaser and an all time favorite dessert. Learn how to make the best baklava recipe that is rich and nut loaded with just few ingredients. And I am going to tell you why this recipe is the best in a few.
If you are depending on store-bought baklava to satisfy your baklava cravings then don't. Making homemade baklava is easier than you think, do not be afraid about dealing with phyllo dough. With some tips and tricks this recipe is going to be your go to party dessert.
Jump to:
Baklava
- Homemade Baklava is easy to make, a great make-ahead dessert, and looks elegant on any holiday table.
- A crowd pleaser and to be honest I still haven't met a person who do not like it.
- This is one of the most iconic Mediterranean desserts you'll ever put in your mouth! It's traditionally served on holidays, especially Ramadan.
I've grown up eating baklava on a regular basis specially in gatherings during feasts and in Ramadan. Everyone I knew used to divide phyllo sheets in half like what we did in this phyllo meat pie here, and then stuff the nut mixture just in the middle.
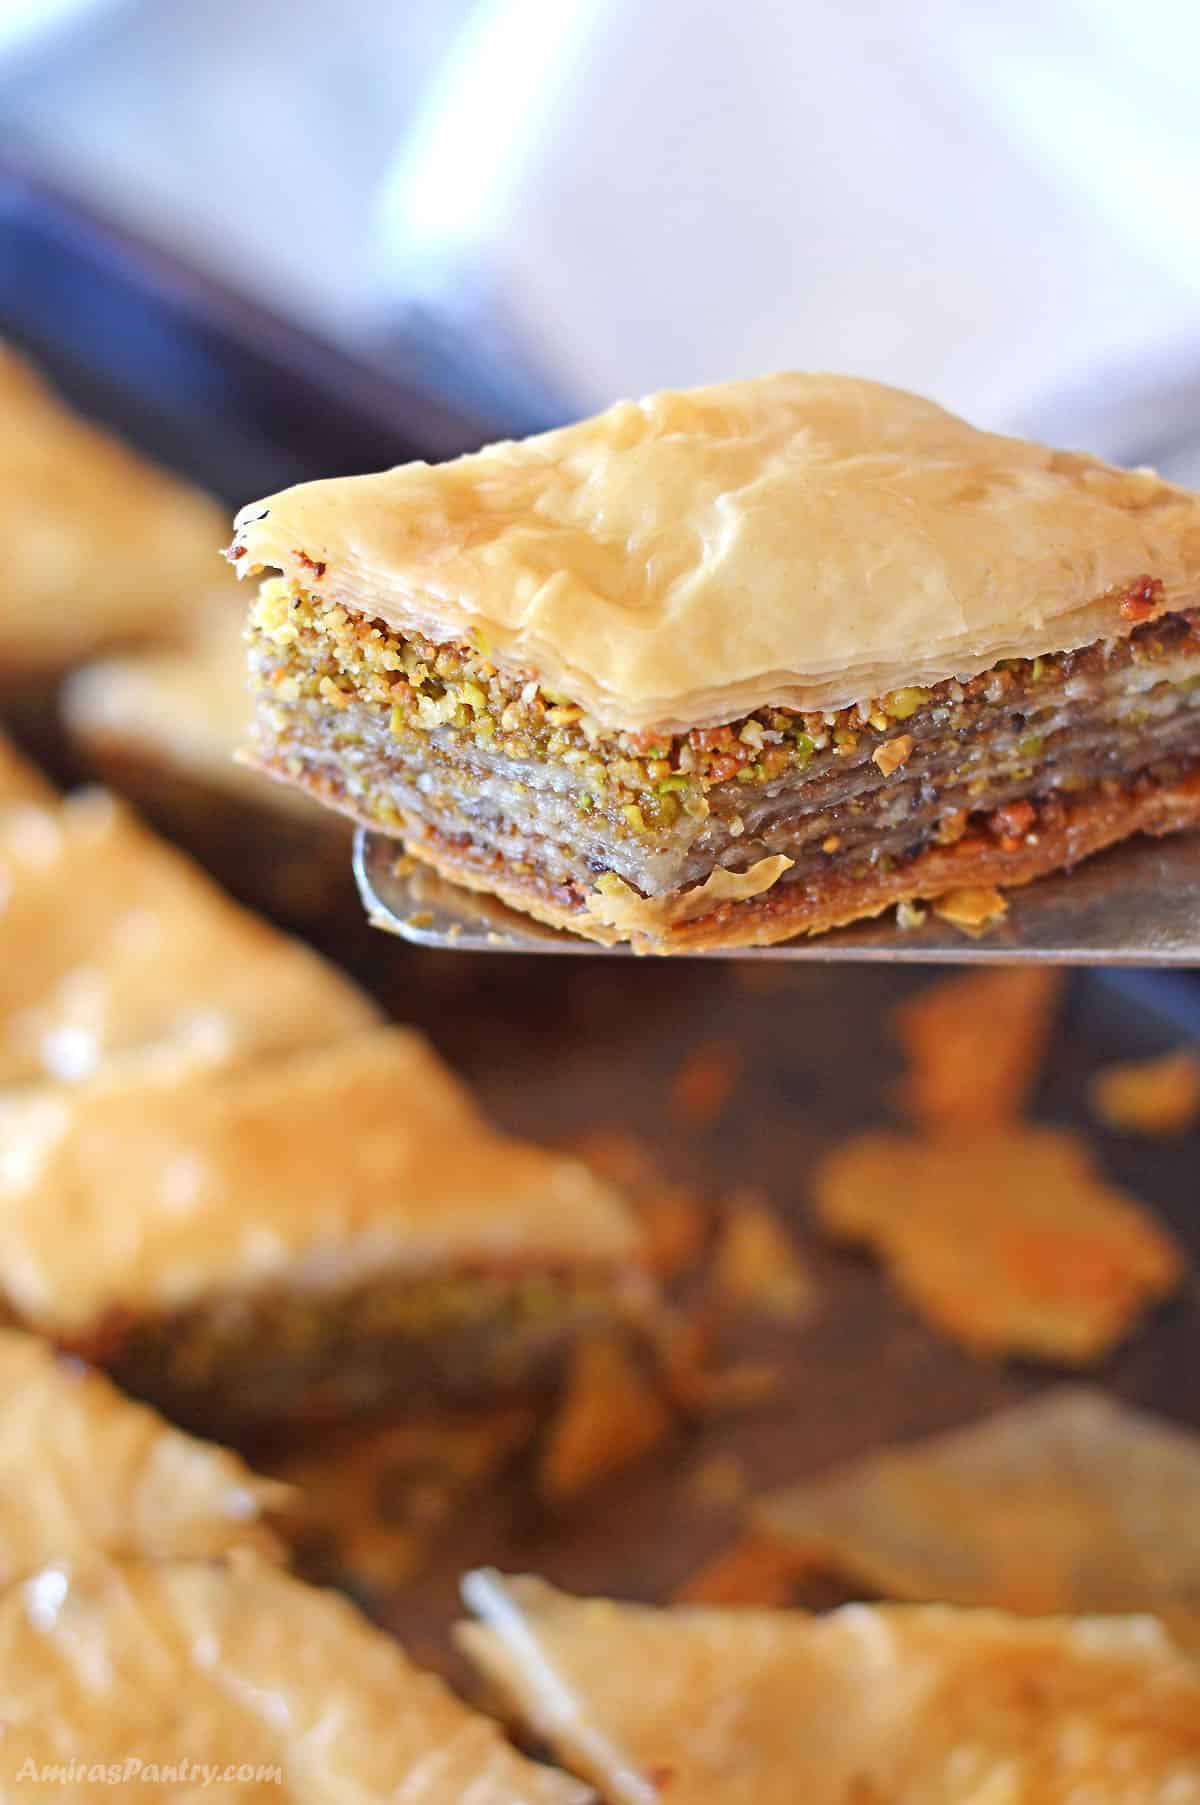
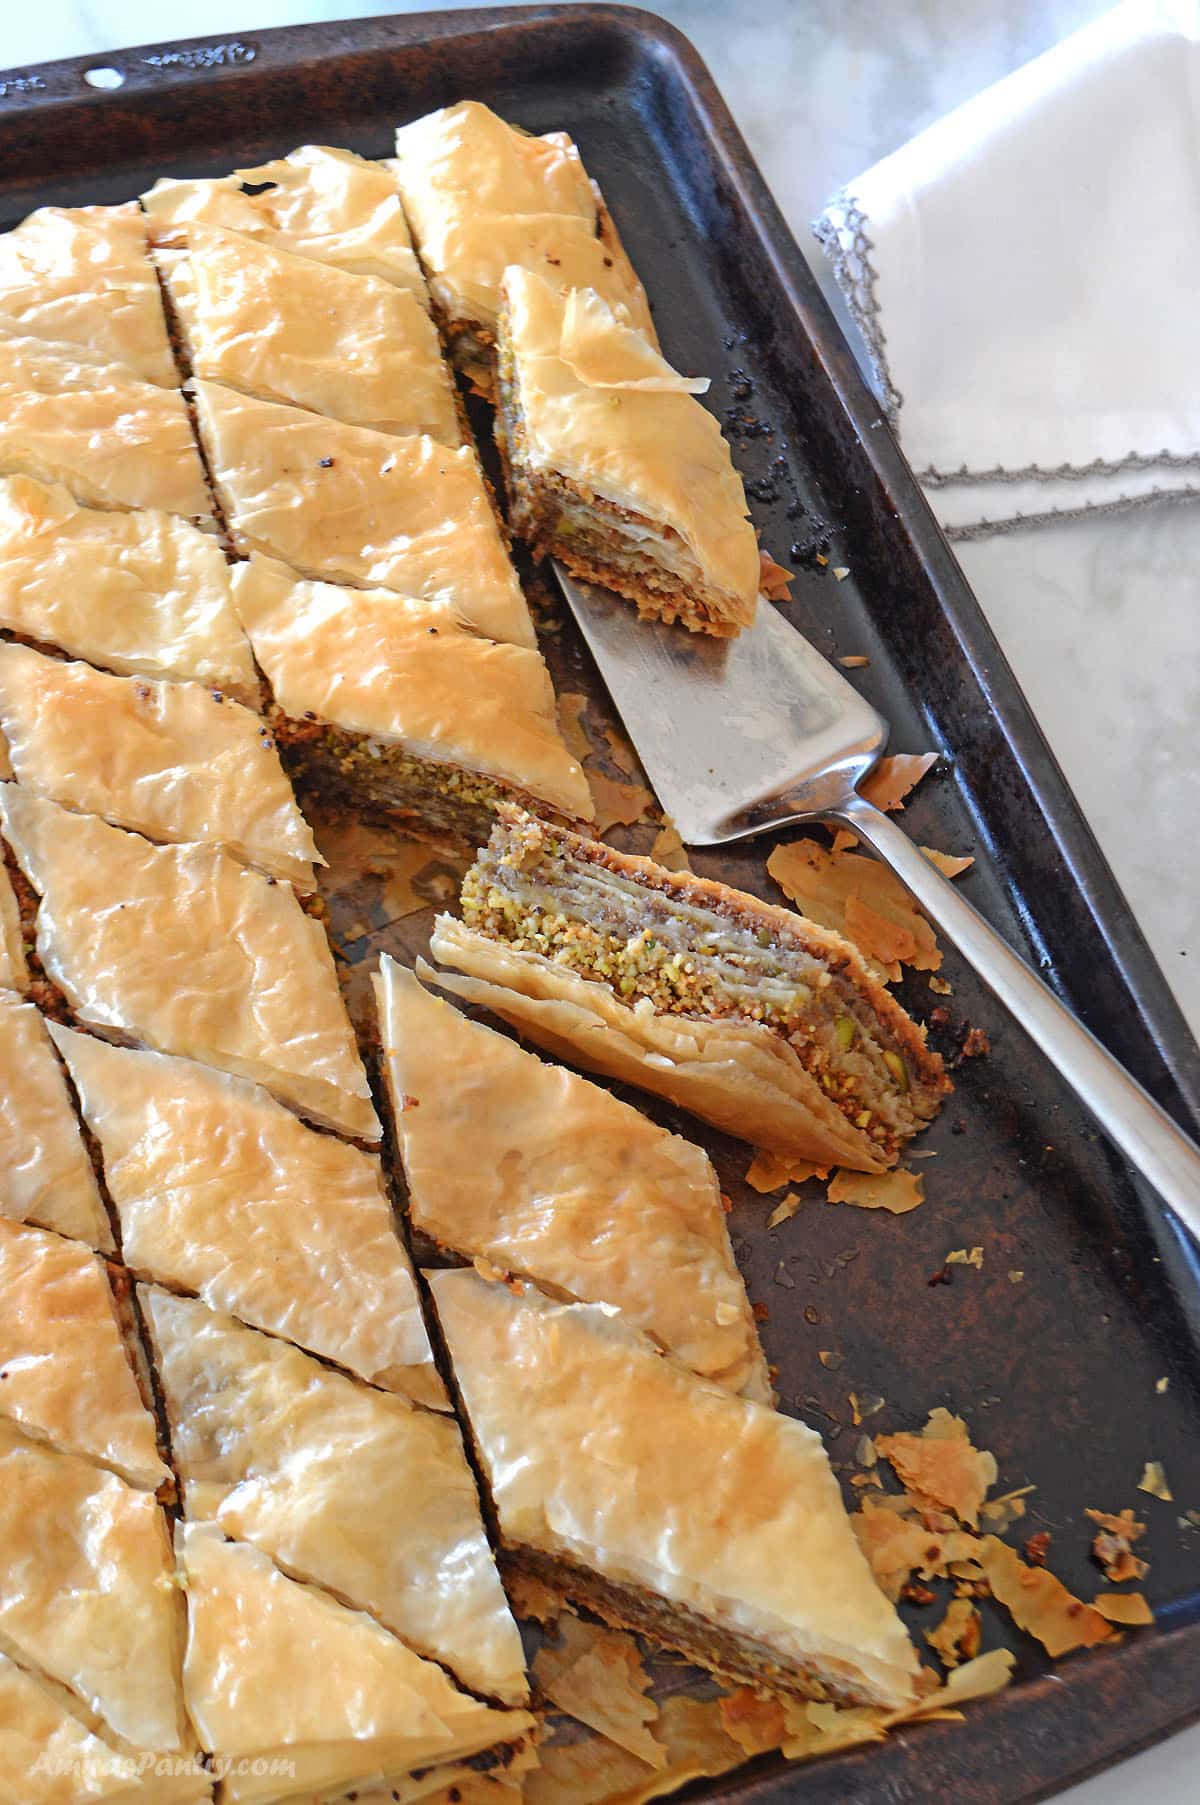
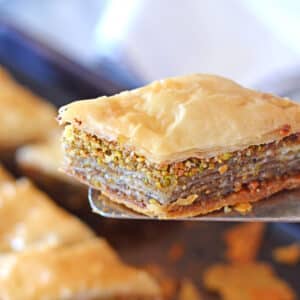
This time we are going to make it bakery style, tall rich butter and filled to the brim with goodness. Everyone will think you just got it from a high end Greek restaurant.
Ingredients you'll need
Note: This is an overview of the ingredients. You'll find the full measurements and instructions in the recipe card (printable) at the bottom of the page.
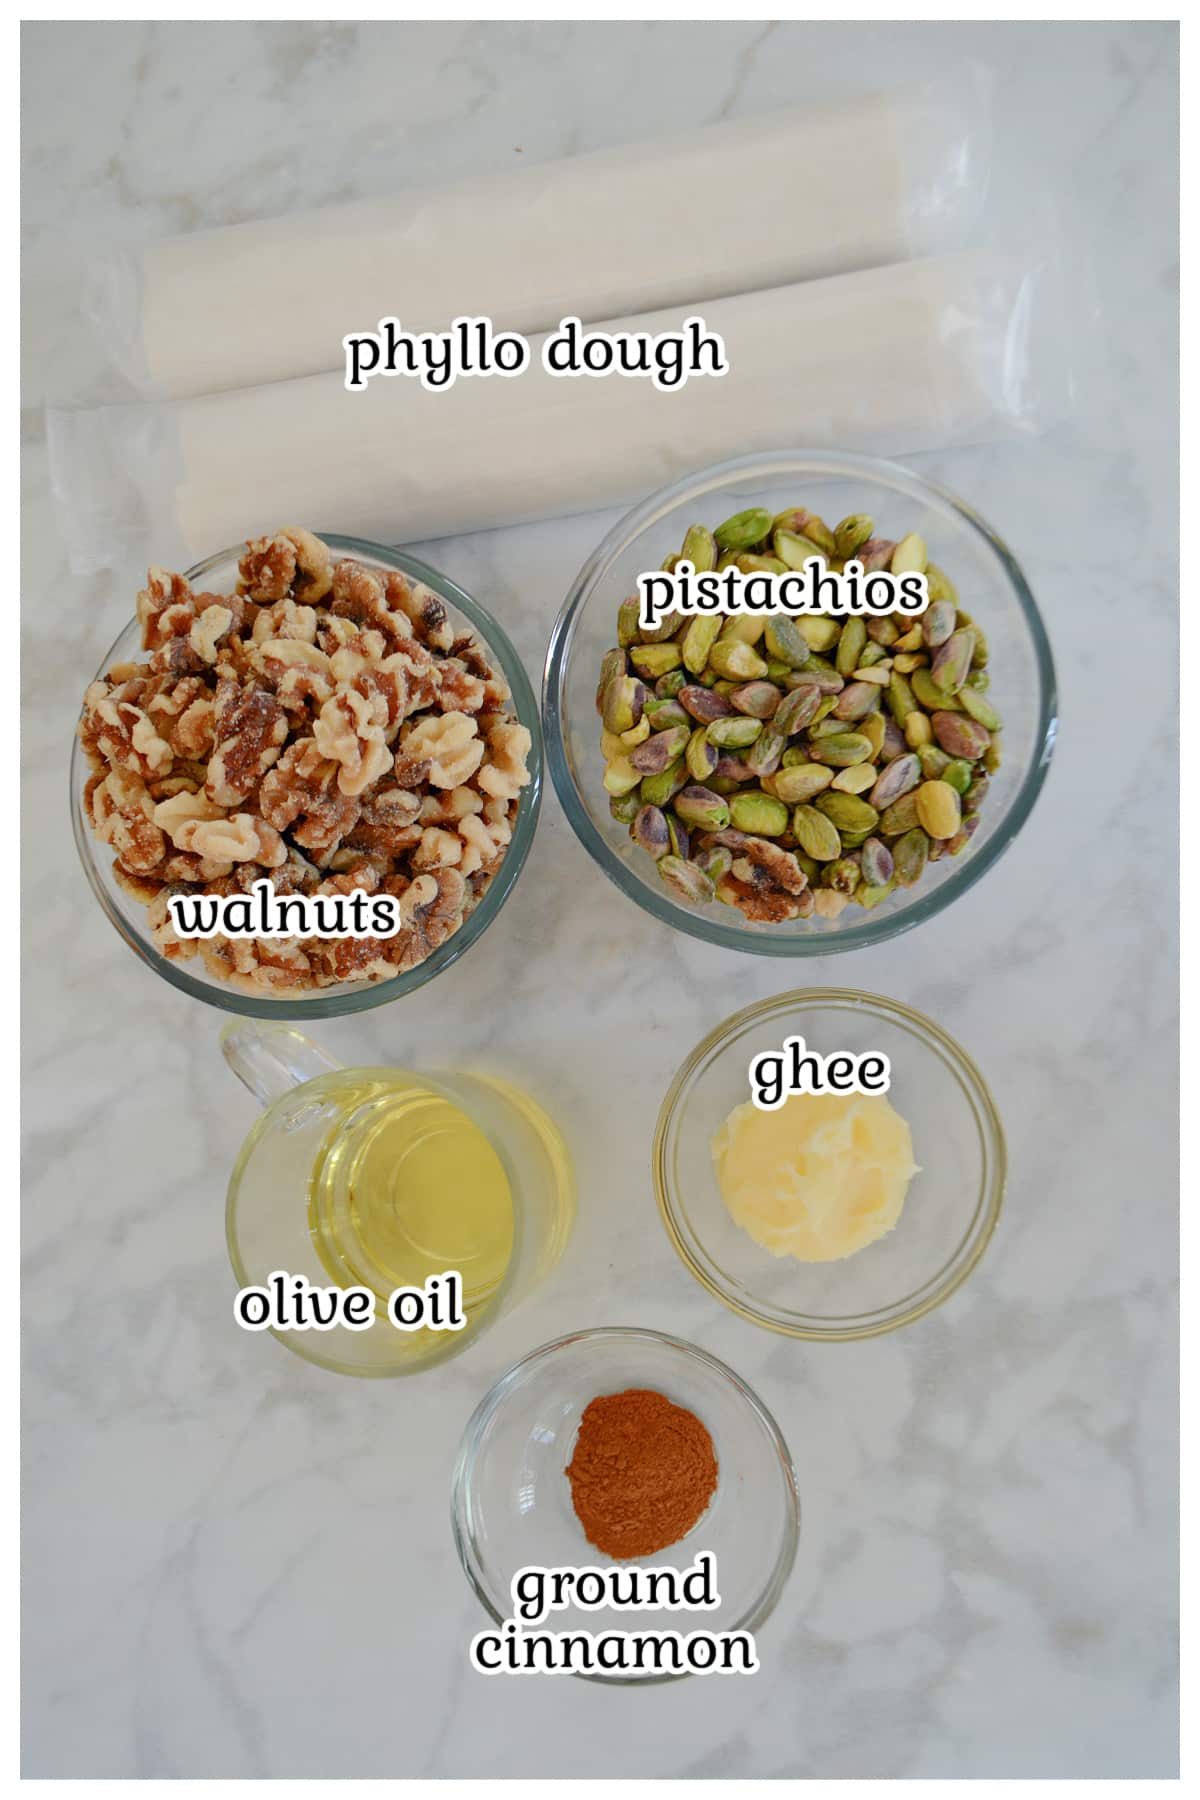
Ingredient notes
- Light olive oil and ghee: I started using this combo recently to lighten up my phyllo recipe a notch. You can use all melted butter, ghee or oil.
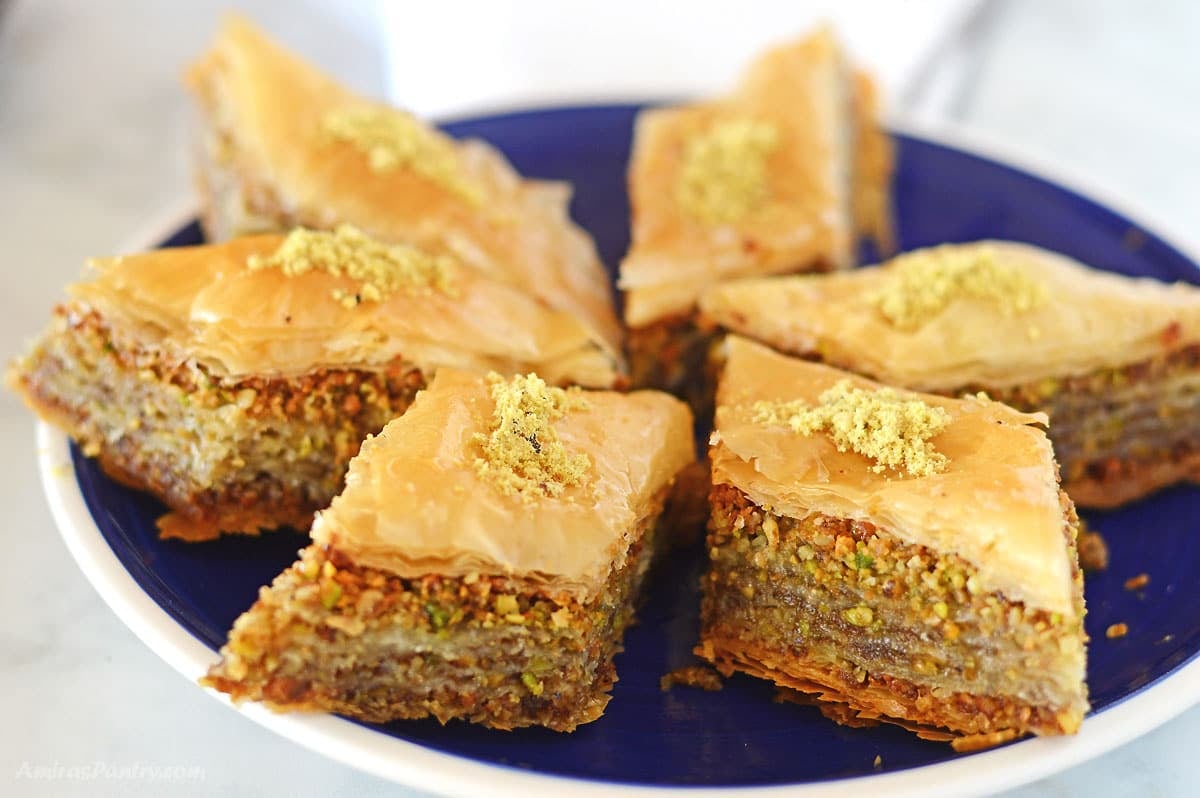
- Walnuts and pistachios: love using a mixture of equal amounts of these but it is really up to you. You can limit your nut to just one or use your favorite mixture. In Egypt though, it is common to add raisins to this mixture in homemade baklava, but I came to like it without the raisins more.
- Cinnamon: for a little flavor to the nut mixture.
- Phyllo pastry: the main ingredient for making any sort of baklava is a package of phyllo dough, or make your own sheets if you want to.
- Sweet honey syrup: not pictured above, made as usual with sugar, water, lemon juice and honey and flavored with your favorite baklava flavoring.
Step by step: instructions
Note: This is an overview of the instructions. The detailed instructions are in the recipe card below.
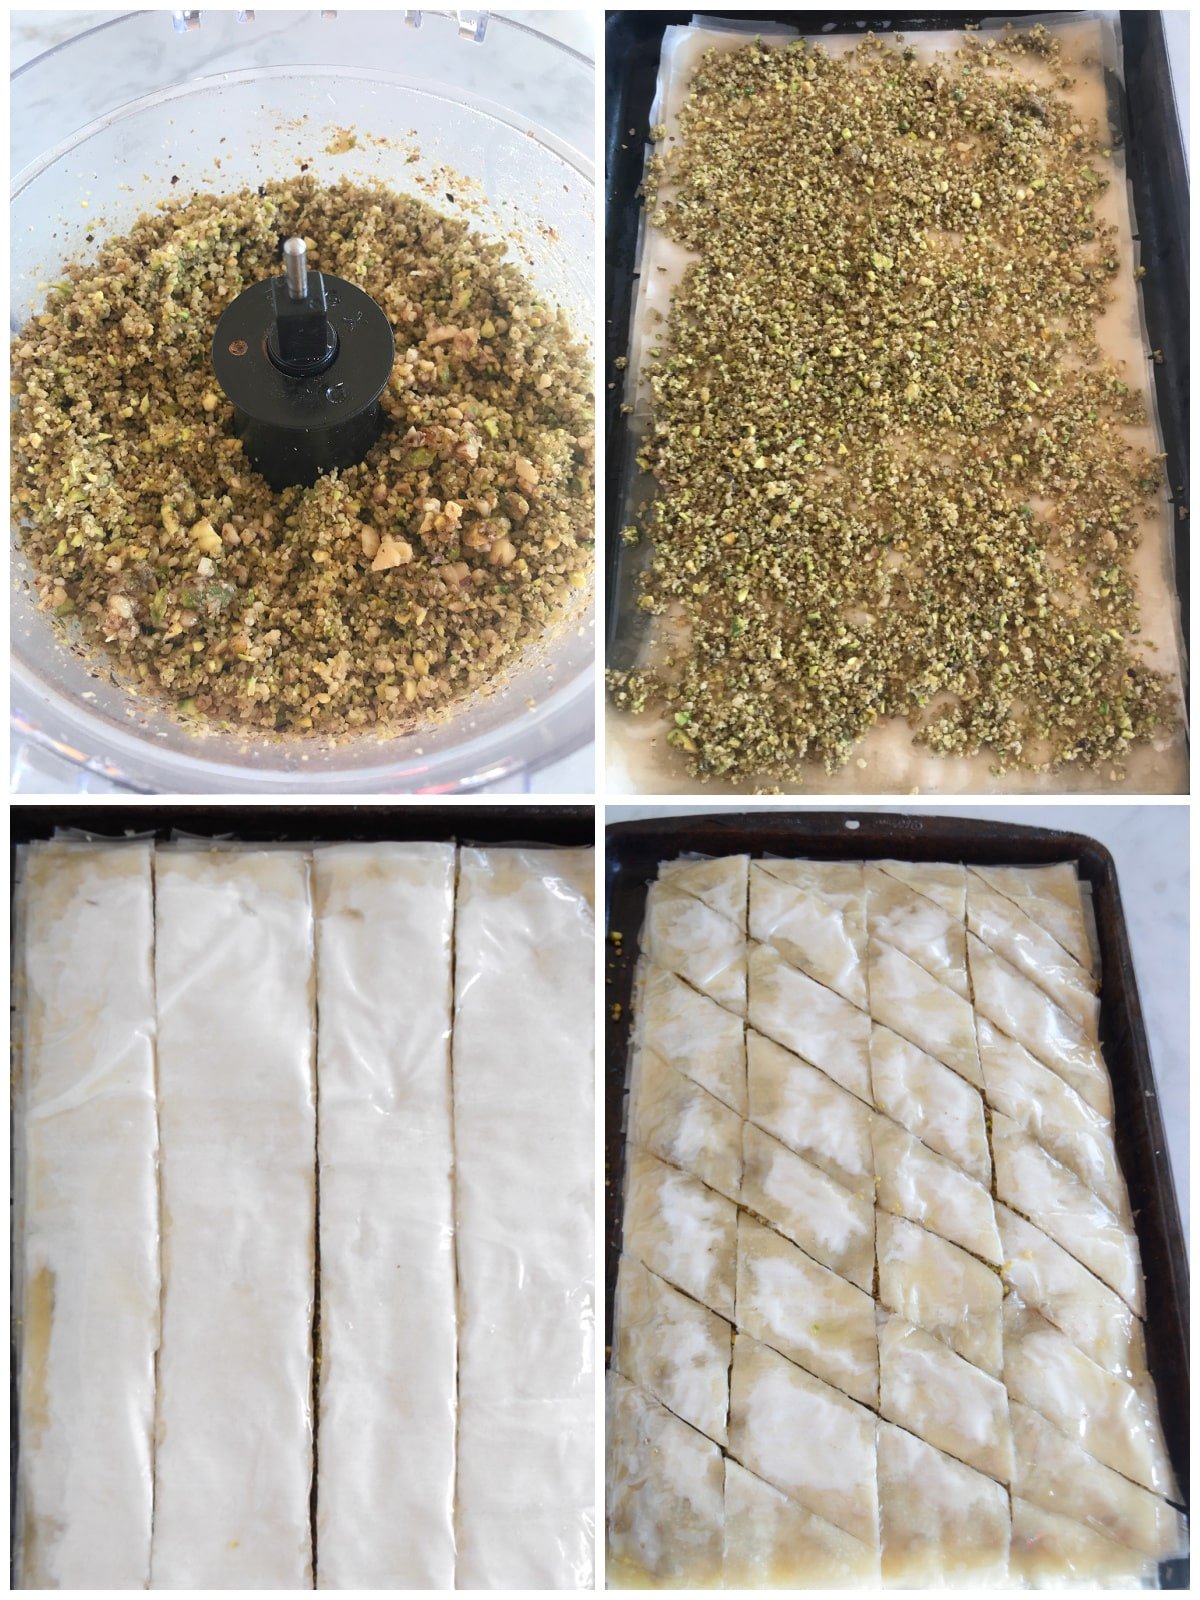
- In the food processor add a pound of nuts with some cinnamon and honey or simple syrup. This is my sister's tip and it is optional but it makes the filling less likely to fall out of your baklava.
- In a small saucepan, melt ghee, then turn heat off and pour oil over. Layer two sheets of phyllo dough and brush with the fat mixture paying more attention to the edges. Continue layering couple of sheets and brushing until you are done with 10 sheets. Spread about 1 cup of the walnut mixture on top of the first 10 sheets.
- Layer 5 sheets on top brushing in between the sheets. Then spread some nut mixture. Continue to do so until you are left with the last 10 sheets for the top part. Spread the remaining amount of nut mixture then layer those 10 sheets as the final section brushing in between as well.
- With a very sharp knife cut the phyllo into diamond shape or squares and bake. Pour cooled syrup over hot baklava.
My notes
- As I told you in the ground beef phyllo pie, do not freak out when using phyllo dough. Just cover it and pay more attention to the edges when you are brushing with the fat.
- If your phyllo got torn, it is ok and no one will ever notice. I like to keep the top layer, the one I put on top torn-free and that's it.. any other layer does not really matter.
- Use a baking sheet large enough to include your phyllo sheet without the need to cut the edges so it fits. This make making baklava even easier.
- You can make the syrup a couple of days before the baklava so you are sure that you have a cooled syrup ready to go.
- If you want to transfer the baklava to a nice looking serving platter after baking then do not cut the baklava all the way through. This way and after baking you can use tow spatulas to transfer the whole thing to the serving platter.
- I love adding honey to simple syrup as I noticed it prevents it from forming crystals and gives a unique desirable taste to my syrup as well.
Storage and reheating
Refrigerate or Countertop: Place leftover baklava in an airtight container in layers separated by parchment paper and refrigerate, or keep on your counter, for up to 2 weeks.
Freeze: Baked baklava freezes very well for up to 4 months. Place baklava pieces in an airtight container separated by parchment paper and freeze. Thaw overnight in your fridge or for a couple of hours at room temperature on your counter.
Unbaked baklava freezes well too. After assembly, place baklava in freezer for 3-4 hours until frozen hard. Wrap with plastic wrap then a freezer bag or container large enough to hold it. Freeze for up to 4 months.
Reheat: Unwrap frozen baklava and place in a prepared baking sheet. Let it thaw then bake as directed.
Make ahead
Baklava is a perfect make-ahead dessert, and it is even better the next day. As mentioned above, in the storage section, baklava is freezer-friendly, baked or unbaked. It can be kept in the freezer for up to 4 months.
Perfect pairings: what to serve with
Make this baklava recipe as a dessert to end a delicious Gemista drizzled with Greek Yogurt Dill Sauce and a side of Greek Salad with Feta.
📣 Related Recipes
- Basbousa is a traditional Egyptian dessert made from semolina flour, coconut, yogurt and soaked in simple syrup. It’s delicious and easy to make!
- Baklava Cheesecake is a delicious fusion dessert that combines the flavors of classic baklava with creamy cheesecake.
- Baklava Rolls are the perfect portioned treat for any occasion. The delicious blend of sweet, nutty and crunchy makes these rolls irresistible!
- Galaktoboureko is a beloved Greek custard pie featuring buttery crisp phyllo sheets and creamy rich filling. All drizzled with fragrant sugar syrup. A must try beloved dessert.
I hope I have convinced you to make homemade baklava. You'll really love people's reactions when they know you made it at home. Plus, it is not overly sweet as store-bought and perfectly flavored to your liking!
Traditional Baklava Recipe
Ingredients
- 1 (16oz) package phyllo dough.
- ¾ cup light tasting olive oil
- ¼ cup ghee. Note1.
For the filling
- 1 lb (450g) mixed nuts. Note2.
- 1 teaspoon ground cinnamon.
- ¼ cup honey/simple syrup or corn syrup.
For the simple syrup
- 1 cup (225g) granulated sugar
- 1 Tablespoon lemon juice. (juice of half a lime).
- ¾ cup (170ml) water.
- 1 teaspoon vanilla extract. Note3.
- ¼ cup honey.
Instructions
- Thaw the phyllo package according to package direction.
Make the syrup:
- Combine all the ingredients in a sauce pan over medium high heat, lightly stirring. When it boils, reduce heat to low and let it simmer for about 10 minutes. Turn off the heat and let it cool completely.
- Pulse or chop the nuts and mix with cinnamon, add the honey or syrup and mix well.
Layer the Baklava:
- Melt ghee in a sauce pan, be sure not to burn it. Take it out of the heat and add the olive oil.
- Brush a suitable oven dish or baking sheet lightly with the fat. Note4
- Start layering the phyllo sheet brushing each couple of layers.
- Do so until you are done with 10 the phyllo sheets.
- Spread about ¼ of the nuts mixture then layer another 5 sheets brushing in between.
- Continue this pattern until you are left with the last 10 sheets of the phyllo for the final layer. Note5
- Preheat the oven to 350F.
- Cut the phyllo sheets in diamonds, squares or any shape you like.
- Bake for 50 minutes to an hour or until it is puffy and golden brown.
- Pour the cooled syrup over the baklava, you’ll hear it sizzle and smell the goodness.
- Let it cool completely then serve.
Video
Notes
Bottom layer 10 sheets then ¼ of the filling
then 5 sheets topped with ¼ of the filling
then another 5 topped with ¼ of the filling
then another 5 topped with ¼ of the filling
Finish this off with a final layer of 10 phyllo sheets. Another time I had 40 sheets so I started with 10 and ended with 10 then divided the other 20 sheets into 4 (5 sheets) layers. Please check the nutrition disclaimer policy.
Nutrition
Sign up and learn more about Mediterranean flavors
👩🏫 My Personal Experience
This is the best baklava recipe I've ever made, and since I've done it I did not go back to the old way. By dividing the sheets into 4 or 5 sections, stuffing and layering nuts in between these sections you get a much better, taller and crisper baklava. A bakery style baklava indeed that everyone will think you just got it from a high end Greek restaurant.
Homemade Baklava is way better than the store bought ones. Why you ask? well first of all it is fresh and you can feel it in the crunch of the phyllo layer. Second: it is filled to the brim with your favorite nut mixture, my favorite is walnuts and pistachios. Third: the syrup, which makes all the difference. To be honest there are several baklava out there that is too sweet, and this comes from a sweet tooth Mediterranean girl, so imagine how sweet they can get. Plus you can flavor the syrup of your baklava however you want. Vanilla, cinnamon, rose water, orange blossom water...etc. Add to all the above that making your own baklava is cheaper and so easy.
By easy, I mean it does not require any baking skills. No complicated steps, just layering, brushing and more layering of phyllo sheets. It does require some work but oh it is so worth it.
Maurice
Yaaamy made it with the number of philos the package had 21 sheets
thank you Amira very easy to make. came out great. next time I will have it with a little less syrop.
Della
I live baklava! This is a must Do! Thanks for recipe! ❤ happy and prosperous New Year everyone! ❤
Amira
Thanks Della, same to you too my friend.
Eliana salamanca
Hi Amira, how many layers you put on the bottom of the pan in the beginning before you add the first layer of the pistachio?
And then you layer on the second ti e 10 layers of the phyllo and after pistacho again!
How many sheets co es in the pakage and how you divided them
Thank you
Amira
Eliana, I know it is confusing but it is not that complicated and it really does not have to be precise. Anyways, I've tried to explain this in the recipe card above but here it is once again in case you cannot find it. Note5: Some math is needed for these steps guys so I will give you an example here: for instance I had 35 phyllo sheets in my package so here how I’ve done it: Bottom layer 10 sheets then ¼ of the filling then 5 sheets topped with ¼ of the filling then another 5 topped with ¼ of the filling then another 5 topped with ¼ of the filling Finish this off with a final layer of 10 phyllo sheets.
Another time I had 40 sheets so I started with 10 and ended with 10 then divided the other 20 sheets into 4 (5 sheets) layers.
Teresa
Ach! I just made this yesterday!1 day late but I'll try this another time. I make mine with rose water or orange blossom. A little bit of that in the filling along with cinnamon nutmeg or just cinnamon. This is how I learned it Lebanese style. No honey in the sauce I will appear I was always worried it would make it too heavy tasting. Most important thing is cold syrupThanks for posting this I will have to try but your way next time. Also thank you for all of the posts and chances to win this month. I came to your Blog for the middle eastern food, But stayed for all of the other treats you show.
Amira
Thank you so much Teresa for your comments, they always cheer me up. Yes rose water and orange blossom are very popular in this recipe especially in the Levant area. I lobe orange boleeom water more than rose water actually. But baklava is tasty and delicious with whatever, who can say no?! right.
Loreta
I love baklava and want to make it for a party but one friend has a deathly allergy to cinnamon, What can I substute?
Amira
Loreta, you can use nutmeg, allspice or cloves or even leave it out. I hope this helps.
nikki hodges
Excited to try and make my first pan!
Rebecca
The BEST recipe for baklava! I tried other recipes and was about to give up trying to make a yummy baklava-until I found this one. Everyone loved it! Even people who said they don’t like baklava, loved THIS BAKLAVA. Thank you!!
Amira
Rebecca so glad you liked it and thank you for the feedback.
Samaa
I made this baklava today & received so much praise for it. I used 2 cups of walnuts in the filling & split the phylo layers into 2 only with filling in the middle.
Anastasia
Perfection. A definite crowd pleaser!
Raelyn
I am going to make this recipe in a few weeks. Can you please provide some advice on storage of the baklava after it’s made? Should it be completely sealed in a container, or leave some air to it? And does the baklava freeze well? Thank you.
Amira
Raelyn, thank you so much for your interest in this recipe. I usually store Baklava in an air-tight container on my counter. If I want to store it longer I refrigerate or freeze it. I also usually freshen it up a bit in the oven just to crisp it up.
Rose
This turned out perfect!! The only change I made was to line the baking sheet with parchment paper for easy lifting and not to ruin the look. Everyone was pleased with the taste and the look.
Amira
Rose, this is such a great tip. Thank you for sharing your experience I am glad you liked it.
Kristen S
This is probably the 5th time I make this. I play with the cookie cutter to reflect the season. Flower shaped, ginger bread, bunnies and so on. Looks so cute every time and the taste is amazing. I also used pistachios instead of walnuts sometimes. Thank you.
Amira
Kristen, thank you for trying this recipe out. This is a great idea thank you for sharing this and your feedback.
Azzah
Hello Amira thank you for the baklava recipe. I am trying it today.
My phyllo package has
Total of only 28 sheets
Size 12”x17” so how do I
Do the math in layering
My pan is the whole cookie sheet 12x17 will it be too thin Thank you
Amira
Azza, here is what I am thinking. Here is my suggestion place 8 at the bottom and 8 at the top then you will be left with 12 sheets. Divide these 12 sheets into 3 (4 sheets) layers. So here is the order I am suggesting 8 sheets at the bottom, 1/4 filling, 4 sheets, 1/4th filling, 4 sheets, 1/4th filling, 4 sheets, 1/4th filling, then a final layer of 8 sheets. I hope this is clear. Let me know if you have any questions.
Tami
I like the heart shape baklava. So cute. How were you able to take out the whole baklava pack without breaking.
Amira
Thank Tami. Actually when I cut it, I do not go all the way through so at the bottom there will be a couple of phyllo still attached.
Donita Damman
So question do you brush every sheet of the filo with the ghee or do you do every couple
Amira
You can do both Donita.
Sommer
My mom uses ricotta cheese in the but mixture. I'm in Saudi Arabia now and ricotta cheese is hard to find. Could I use ashta (قشطة) in the baklava? Have you heard people do that before?
Amira
Sommer ,yes sure in fact we do that all the time and sometimes we even fill it with custard. Check this recipe that I have for making this type but shaped differently. Thanks dear for passing by.
Fran @ G'day Souffle'
What a great design for your baklava- never seen anything like it! And thank goodness you didn't have to use that 'ugly old baking sheet" (ha ha). This reminds me, I think you also have a recipe using phyllo pastry and a custard filling? Yum, I'll look it up!
Juliana
I have never made baklava...yours looks so good Amira...I love the crispy and gooey together in one bite.
Thanks for the recipe, and I hope you are having a fabulous week 🙂
John/Kitchen Riffs
This looks gorgeous! Very creative. And love baklava. It's finger licking good (literally!). 🙂
Amira
It is, I love baklava so much. I hope you'll get the chance to make it John.
Karen (Back Road Journal)
Baklava puts a smile on my face and I love how you made it special for Valentine's day.
Amira
Thanks Karen, I hope you'll try it soon.